
Hot on the heels of last weeks post about Keyboard Maestro, I’ve also been experimenting with another app called Hazel to automatically tidy up certain files based on pre-programmed choices. In itself, having an app automatically file things out of my Downloads folder to somewhere more appropriate, based on file type and source for example, saves me doing it manually (or not bothering….) but following on that I’ve also found it really useful when preparing blog posts.
One of the constant pains for me, a non-designer, has always been preparing media for my blog posts, be it images of what I’m discussing, or links to apps I recommend. In the past it’s been a bit of a manual task, which for takes too long and consequently I don’t push posts out as often as I’d like because of it. But now I’ve found a way of using Hazel, and Automator workflows to create the images for me to push straight into my blogposts.

Click to expand
For those that don’t know, Automator is a program that comes with every Mac that allows you to create little workflow apps using drag-and-drop to create recipes for automated processes. There’s a huge amount of things you can do with it, but I’ll come back to what I’m doing with it in this case a bit later in to this post.
The problem I had is when I need an image in a blogpost, invariably I’ll acquire an image from somewhere (my own Lightroom catalog, or a stock photography site perhaps) that will be in a different size to what I need in the blog (typically 150×150 pixels). Previously, for every image I uploaded I had to prepare a smaller version manually by scaling it in one of my image editors. But there’s a quicker way using a combination of Hazel, and an automator workflow……
Firstly, I realised I was going to have to create a way of telling my Hazel action that the file I downloaded was for the blog post, so I chose to save them (temporarily at least) to my Desktop and give them a green colour tag (I knew I’d eventually find a use for tags!). Once I’d done this it was easy to get Hazel to spot these files and begin a process to convert them.
Click to expand
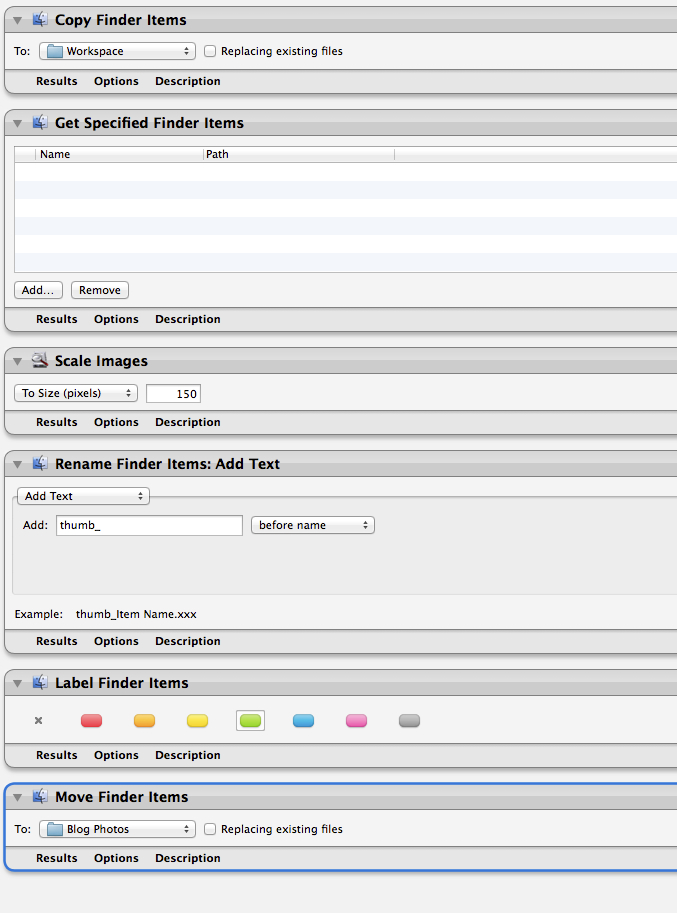
The next step was to create an Automator workflow that took the file(s) and scaled them to the size I wanted. Of course I wanted to save the full size copy as well so that I can use both in the post (click on the smaller images in my posts and you’ll usually see a bigger version). So the process was to copy the file to a temporary area, scale it, tag it green (for clarity) and move it to the Blog Photos folder I have set up on my local machine. Later on I might try to automatically upload the images to my webserver as well.
You can see the workflow I created in the link to the left. Hopefully it’s quite clear how the process works, but I’ll walk you through it in brief.
The Hazel process, which I’ll show next, identifies any files you want to process and passes them to this Automator workflow and follows down the list of tasks. First, it copies these files to a temporary place while we process them. Next, it scales the image to a maximum of 150 pixels (if it’s a square image it will be 150×150, otherwise it will scale so that the longest side is 150 pixels). Next, it add the prefix thumb_ to the original name of the file so we can easily identify the thumbnails, and then tags them green (the original tag is lost when copying. Finally it moves the scaled, renamed and tagged file to the folder I use to keep all my web images before uploading.
Click to expand
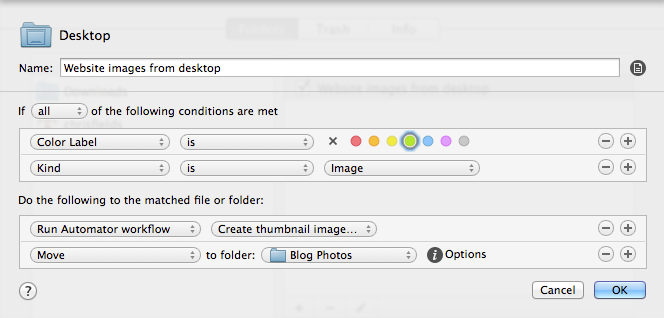
Lastly, let’s look at the Hazel rule that initiates all this. Again, you can see this by expanding the link at the left. Essentially, all I have to do when downloading an image I intend to use on the web is remember to save it to my desktop (the rule is watching my Desktop folder, but I could have it running across others as well if I wished), and to tag it green. Those two things force the creation of a suitably sized thumbnail. This is done by initiating the Automator workflow I just mentioned, and by moving the original file to the same folder we just moved the thumbnail file to. One other thing – I try to ensure I name the file something appropriate when saving it so that I can easily identify what it is without previewing it.
Again, this is a small step towards making my life easier when it comes to creating blog posts, but I can see so much potential for shortening this further with things like TextExpander (for creating the full html code for the lightbox images you see) and Transmit (in my opinion, the best software available for file transfer which I’d use for uploading the files to the webserver automatically in the Automator script) in future.
Hopefully it’ll give you some ideas about what you can automate, and if so, I’d love to hear your ideas.
Have a great Bank Holiday Monday (for those celebrating it), and a better than normal Monday (for those who don’t)!
Links for things mentioned:
 Buy Hazel for Mac |
 Buy Keyboard Maestro for Mac |
 Buy TextExpander for Mac |
|
Buy Transmit for Mac |


